


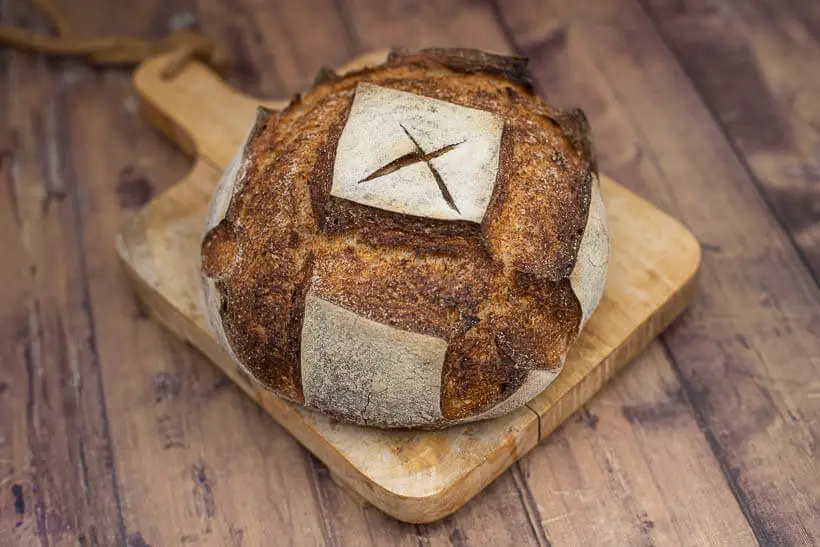
Once you’ve had real sourdough bread, there’s no going back. No, I don’t mean the stuff from the supermarket that’s made by adding citric acid and some yeast. No, I mean the kind that’s been allowed to develop taste over many hours, fermented to perfection, and then baked until golden brown and super crispy. This is my artisan sourdough bread recipe.
Now, I felt it was time to publish my updated Master Recipe for sourdough bread. This is used as a base for any kind of lean sourdough bread recipe I make, and it is now yours, too.
If you are just here for the recipe, you can press the button underneath to be automagically transported to the recipe:
Jump to Recipe Jump to VideoUpdated recipe
The recipe was updated in May 2023 to reflect the results of the growing list of experiments that I have done on baking sourdough bread. This recipe will be updated when I discover something significant.
What was updated in version 2?
- Amounts in the formula were made more “user friendly” while retaining the hydration and adding insignificant weight.
- Expanded the methods of agitation to include no-knead, machine mixed, or whatever type of folds you like.
- Expanded baking to include open bake, oven-off, and two-stage covered baking. Change the temperature to 230°C/450°F all the way through the bake.
- Added notes on hydration, salt, and many other small improvements.
- The article for grammar, precision, and tone.
The background for this artisan sourdough bread recipe
When I started baking sourdough bread, I read every site, book, blog, and everything else I could get my hands on.
I wanted, nay, needed, to know how it worked. I wanted a ‘sourdough model’ in my head, culminating in my article Sourdough Bread for Beginners.
It was by no means a bad piece of work. I’d worked on it for months, and everything I had learned was poured into this article. About 6 months later, it turned into my third video on my Foodgeek YouTube channel.
In May 2019, I made a timelapse recording of my starter after feeding, which became my first “Experiment Time!” video.
Over the next years, I made over 60 videos with different scenarios for baking sourdough bread.
I always tried to keep it based on scientific thinking, having a control bread and only varying one variable at a time. At least when that made sense.
All of those experiments and their conclusions have been used to make this new Master Recipe.
That being said, you will need a sourdough starter to be able to make this bread, so if you’re new to sourdough baking, go read my article on making your own sourdough starter.
The tools needed for this artisan sourdough bread recipe
Ad links! The links for ingredients/items in this section are affiliate links, which means I will get a commission if you purchase the product!
To make artisan sourdough bread, you’ll need some tools. I’ll divide this section into what you need and what you probably want after hitting the ‘geek’ stage of baking sourdough bread.
The ‘essential’ list:
The ‘geek’ list:
The techniques needed for artisan sourdough bread recipe
Stretch and Fold
There are several ways of agitating a dough to promote gluten development, and you can say that the longer the fermentation is, the more likely it is to happen all by itself.
It’s all about hydrating the protein glutenin present in wheat flour (and, to some degree, other flour, too) to start forming gluten bonds with the other protein gliadin in the dough, helping us with the structure of the dough.
You can make sourdough bread with no agitation, kneading, machine mixing, stretch and folds, slap and folds, coil folds, and probably any other method you come up with that moves the dough around.
I’ve chosen stretch and folds for no other reason than that it is a great way to feel the dough develop, and it’s also super satisfying to do so.
Use whatever method that works best for you and your personality. They’re all good.
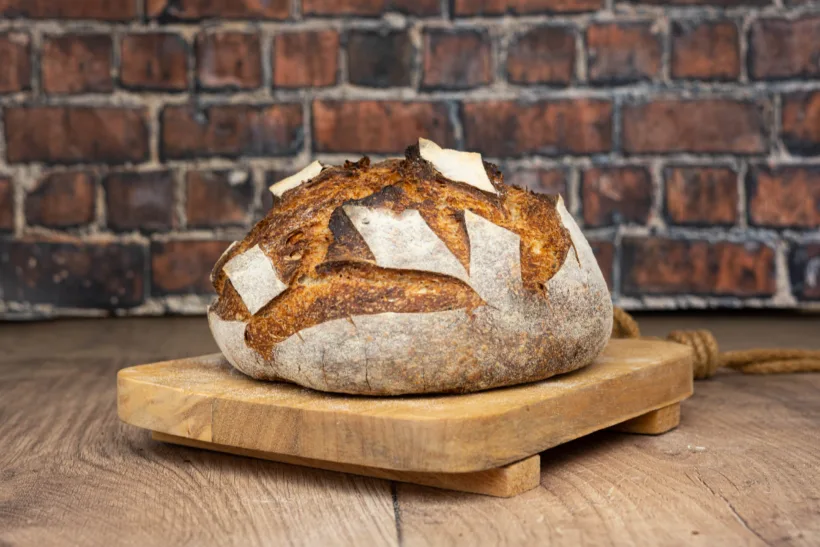
Boule shaping
A boule is a round shape of bread. Shaping boules is easy to do and easy to learn.
It should be done on a kitchen counter without ANY flour.
Basically, you just put your bench scraper (or your hands) behind the dough and pull it forward so that the top is pulled down in front of the dough, tightening the top of the dough.
You then turn the dough and proceed until the dough is sufficiently tight.
In the pre-shape, I will go for just a bit tight, and in the final shape, I will go for pretty tight (very scientifically accurate namings, right?). It’s just to give you an idea of what to aim for.
Bâtard shaping
Bâtards are elongated bread. The shape goes from long round over cigar-shaped to torpedo, which describes how tapered the ends are.
Bâtard shaping is a final shaping technique. It can be done in numerous ways, and none are more correct than others.
It’s about shaping a piece of dough with tension around the loaf along the long side.
If you watch the video for this Foodgeek Master Recipe, you can see in great detail how I do it.
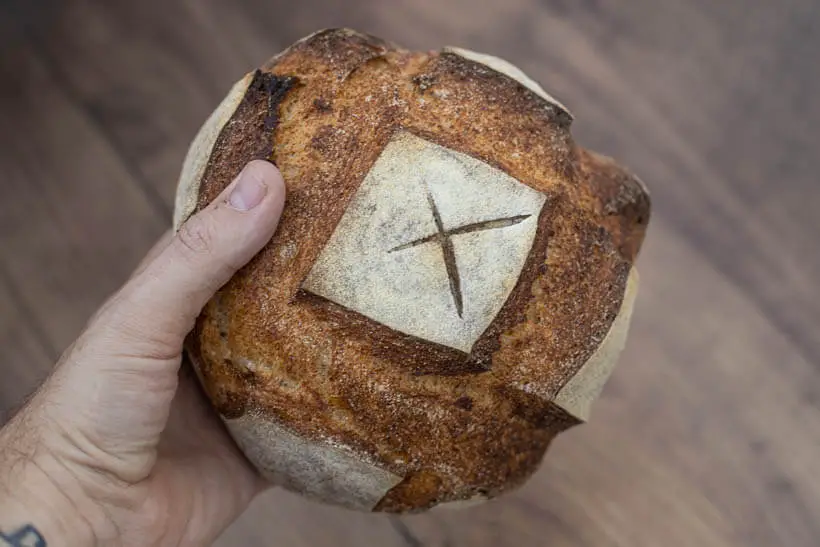
Scoring
Scoring bread is a whole skill besides everything that goes into making bread. Part of scoring is having the proper tool and learning how to use that tool.
The cuts need to be precise and decisive. Slash as you mean it. I wrote a whole article about the subject I think you should read.
The dough composition in this artisan sourdough bread recipe
Vitals
| Total weight | 1415 grams |
| Pre-fermented flour | 9.1% |
| Hydration | 69.7% |
| Yield | 2 small boules |
The dough
Hydration
The hydration of the dough in this artisan sourdough bread recipe is 70%. This is a high-hydration bread but at the lower end of that.
This is sort of a catch-all hydration. It should work with most bread flours, but if you use all-purpose flour, you may need to change the hydration downwards. If you use specialty bread flour, you may need higher hydration. Watch the video for how you can test your flour.
Remember that high hydration isn’t a goal in itself. Use whatever hydration your flour wants.
Whole grain
For my whole grain component, I am using rye. I love the taste of rye, plus it gives the bread much more tang. You can use any kind of flour you want though, or even just use more bread flour if you like the ‘plain bread’ more.
Inoculation
The inoculation is the amount of starter to flour ratio. Generally. the more starter you have in your dough, the faster the dough will ferment (up to a point).
The inoculation in this artisan sourdough bread recipe is 20%, which suits a fermentation at a room temperature of about 21°C/70°F.
If your room temperature is vastly lower or higher than that, you may want to change the inoculation.
A good rule of thumb is for each 5°C/10°F the temperature is above 21°C/70°F decrease the inoculation by 5%.
Likewise, for each 5°C/10°F the temperature below 21°C/70°F increase the inoculation by 5%.
Salt
The amount of salt in this dough is 2%. This is a balanced number, which makes the bread taste good without tasting salty. Personally, I like my bread with 3% salt, but do whatever suits your tastes and health considerations.
If you go below 1% salt, the elasticity of the dough can suffer. Your mileage may vary.
| Weight | Ingredient | Baker's Percentage |
|---|---|---|
| 600g | bread flour | 80% |
| 150g | rye flour | 20% |
| 500g | water | 66.7% |
| 150g | starter (100% hydration) | 20% |
| 15g | salt | 2% |
Tinkering with the dough formula
This dough is a great starting point but is meant to change and personalize.
To change hydration, weight, ingredients, inoculation, and everything, you can use this formula as a starting point in my Bread Calculator.
The choices of how to bake your sourdough bread
One major change in this recipe from the 2020 version to the 2023 version is to bake at a constant 230°C/450°F. That opens up a number of different ways to bake your bread.
Two-stage baking for dutch ovens
Ad links! The links for ingredients/items in this section are affiliate links, which means I will get a commission if you purchase the product!
In the recipe, I’ve chosen to explain how to do two-stage baking using a dutch oven, which is a way that both saves time and electricity. Essentially, you do the steaming for one loaf while you brown the other loaf. The more loaves you bake at one time, the more time and electricity you will save. If you can fit multiple dutch ovens in your oven, plus loaves on the side, you can optimize this further. My European oven only fits one dutch oven and one browning bread, so I am limited.
Also, if you want to avoid hoisting the dough into the dutch oven, you can place your dough on a baking sheet covered with baking paper and then place the dutch oven pot on top of the dough. If you want a cheap alternative, I can recommend the Lodge Combo Cooker, which I used for years before getting my (not very cheap) Challenger bread pan.
Turn the oven off when baking without a dutch oven.
Another way to bake is to bake without a dutch oven and use the ‘oven off’ trick.
Note that you will need to turn off the convection in your oven, to not blow out all of the steam when you open the oven.
For this way of baking, you will need a baking steel and two pans at the bottom of the oven. One with a rolled-up towel and the other with lava stones. About 10 minutes before baking, while heating, pour boiling water over the towel to saturate the oven with steam.
Then, after loading the loaves, you pour a cup of water onto the lava stones and quickly close the oven. This ensures both slow steam production and super fast steam production.
Then you turn the oven off for 20 minutes. This saves electricity and gives you an amazing oven spring because the crust sets more slowly. When the 20 minutes are up, remove the steaming pans, turn the oven on to 230°C/450°F, and brown the bread. Usually about 25 minutes.
The conclusion of this artisan sourdough bread recipe
What kind of bread can you expect from this recipe?
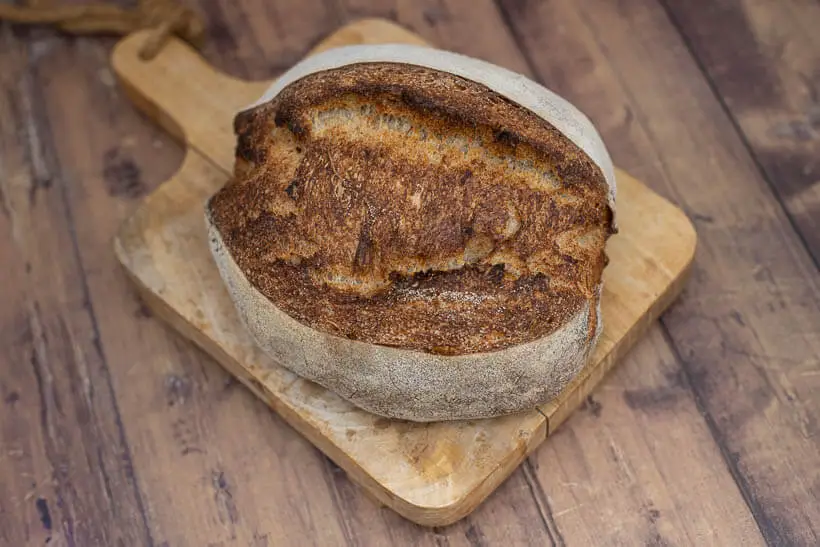
You can expect a wonderful crispy sourdough bread with a deliciously tangy and chewy crumb.
A bread that will stay fresh longer than you are used to if you bake yeasted bread.

A bread with a wonderful taste that’s developed over a long period of time. The quintessential taste of fermented bread.
If you are baking sourdough for the first time, go with your readily available flour.
Once you get a hang of the techniques, I’d suggest you try to buy different artisanal flours and see what you like and how they work. Try different flours for whole grains: wheat, rye, oat, buckwheat, spelt, etc.
Learn what suits your palette. This recipe is the basis for your sourdough adventure.
Please share this artisan sourdough bread recipe on social media
This is my artisan sourdough bread recipe. If you like it, please consider sharing it with like-minded bread lovers on social media.
If you make it and post it on Instagram, please tag me as @foodgeek.dk so I can see it. That would make me very happy.
Foodgeek Master Recipe for Artisan Sourdough Bread
Equipment
Ingredients
- 600 g bread flour
- 150 g dark rye flour substitute with your favorite
- 15 g fine salt
- 150 g sourdough starter
- 500 g water
Instructions
Feed the starter – The night before
- About 8-10 hours before mixing, feed your starter at 1:5:5. That means take 15g starter, 80g flour, and 80g water mix it and let it grow at room temperature.
- If you'd like more sour bread, you can start earlier.
Mix the ingredients and bulk fermentation – The next day
- Add bread flour, rye flour, and salt to a bowl. Mix it with your fingers until it's well-distributed.
- Add 150g of sourdough starter and 500g of water.
- If you want to, you can mix on a machine until the dough looks nice and cohesive. Then go straight to the rise.
- Otherwise, mix with your fingers until no dry bits remain. Leave the dough to rest covered for 60 minutes.
- At this point, you can choose to jump straight to the rise, making it a no-knead bread. Otherwise, you can do three sets of stretch and folds or coil folds spaced out by 30 minutes. Coil folds are best if you are making one loaf.
The rise – jump here for machine and no-knead
- Put the dough in a see-through container where you can monitor the bulk. Let the dough rise by 25%.
- DON'T USE TIME!! Time varies on many factors, so go by the rise, not time.
- If you are bulking cold, below 21°C/70°F, let the dough rise 100%.If you are bulking at room temperature, around 21°C-25°C/70°F, let the dough rise 50%.If you are bulking warm, above 25°C/77°F, let the dough rise 25%.
Divide and pre-shape
- If you are making one loaf and used coil folds, skip straight to final shaping.
- Divide the dough into two equally sized pieces by cutting it with your bench scraper. Preshape both pieces of dough into a boule.
- Let the dough rest on the counter for 20 minutes.
Final shape
- Final-shape the bread into boules or bâtards, depending on what you prefer. Boules are the easiest, so if you're new, go for that. Watch the video to see how you do both of them.
- After each dough is shaped, dust a banneton with rice flour and add the dough. Instead of a banneton, you can use a bowl lined with a dish towel. They will, of course, only accommodate boules.
- Add both bannetons to your fridge. Your fridge should be ice cold. Mine's set to 2°C/35.5°F. Let the bread retard for 4 to 48 hours. You don't have to cover the dough.
Bake the bread
- Heat your oven to 230°C/450°F with dutch oven inside. Heat for 30 minutes to make sure both are completely saturated with heat.
- Grab a dough from the fridge. Dust it with rice flour on the bottom and put your peel over the top.
- Flip it over so the dough rests on the peel. Dust the top with more rice flour and distribute it with your hands. Score the dough.
- Open the oven and take the top off the dutch oven. Grab the peel and add the dough to the dutch oven.
- Put the top on, close the oven, and bake for 25 minutes.
- Prepare the other bread, as above. Then open the oven and take the top off of the dutch oven. Move the bread in the dutch oven to the side, and then add the unbaked bread to the dutch oven.
- Put the lid on and bake for 25 minutes. Then take out the finished bread and put it on a wire rack.
- Take the top of the dutch oven and brown the other bread. Then take it out and put it on a wire rack. Let them both cool to room temperature.
- That's how you make artisan sourdough bread.


Love your content – I’ve been waiting for this updated recipe! 🙂
Can I half the amounts in the recipe to only make one loaf of bread?
Also I’ve always had trouble with my dough being too wet (with various recipes from the internet…) and not holding shape right from the very beginning. Might this be because my flour has a lower protein content (10 %) than recommended? Or should I knead it a little bit at the beginning to help it getting startet?
Wonderful <3
You can use half of the amounts to make one bread.
I’d recommend changing the hydration to a lower number. Maybe 65% or even 60%.
Thanks for the tips Sune! Should I take my dough out of the fridge to rise to room temperature before putting in the oven? Or do I wait until after the oven is full heated for an hour, and then take the dough out of the fridge, then right into the oven?
I heat the oven. When it’s hot I take out the bread, score it and in the over in under 30 seconds 🙂
When I score my loaf, I can see the bread deflating…..
And, your loaf looks so much more firm than mine are, allowing you to score them more formally. Any idea what I am doing wrong? I followed the recipe exactly and was pleased with its progress. They also did not rise as much as yours in the fridge.
It sounds like you may have over proofed the dough before you shaped it. How did you measure the growth?
I’ve been looking for comprehensive instructions and recipe for friends I’m giving starter to. This article is so useful. Thanks Sune from New Zealand in the Spring!
Wonderful <3
I am preparing to make my first sourdough loaf! When you say to feed the starter 1:3:3, are you saying that because the starter will sit overnight? If so, and I am planning to start my dough during the day, can I feed my starter 1:1:1 and use it when it peaks (around 4 hrs)? Thanks and love your videos!
I will usually find the proportion so that my starter will peak around when I plan to bake. So feed at night, get up at 5am and make dough. You don’t need to be super fussy about it.
Hi Sune! Great videos. Thank you for all the effort, after watching your videos I was finally able to achieve a sourdough bread that I could send pictures to my friends! LOL
I have to say that my bread came out better with your previous recipe, not sure what happen there. Maybe the room temperature affected the stretch and fold process because it is getting colder here.
Question, any idea on how to achieve a less hard bottom of the loaf? It makes it difficult to cut and eat sometimes.
It’s hard to tell without more information 🙂
To get a less hard bottom you need to even out the heat. I like to use a baking steel for that 🙂
Hi Sune, I’m really enjoying your youtube videos. Quick question – your recipe totals don’t seem to add up to 2 x 700 gram loaves. Am I missing something?
Thanks,
Dave
You have to be a little more specific. What numbers are you adding? Because all the numbers I add turn into 1400 🙂
Looking forward to bake this bread tomorrow.
I had trouble shaping it though, it was really hard to get it firm/tight. What could I have done wrong?
Another thing I am struggling with is that my bread often get very hard, the crust is just too thick after baking. 🤔
I bake it on a baking steel with lid on first half and lid off second half.
It sounds like you may have over proofed it.
Try and leave the lid on the entire time 🙂
Sune! This recipe was great. I got into sourdough at the beginning of the pandemic but haven’t baked for a few months. I’ve been subscribed to your YouTube for a while and saw this recipe. It got me back in the kitchen. I followed your instructions precisely and these were the best, most beautiful loaves I’ve ever baked. Your videos are just wonderful. Thank you!
(A photo of one: https://photos.app.goo.gl/mkqAJL3MvWmCBMW46)
Thanks so much for the tip on the fridge. Another question for you, how do you keep your dough from sticking to the scale?? Is that a cookie sheet you’re using in the video that sits on the scale?
@foodgeek thank you for this recipe. It’s my third time baking it. Re-reading the full recipe I understand I didn’t let the dough rest in banotine long enough. Will do next time.
Just curious if you think it’s okay to leave in the fridge for >48 hours? I had one in the fridge for over 72 hrs (though it had higher hydration than your recipe) and it came out very tasty, so was thinking of trying another long proof. Just wondering if you would caution against it for some reason? Thanks again!
“Amount Per Serving (1 bread)”. I can relate.
I followed this recipe and method and made my best and fastest sourdough bread! I have saved half a day not waiting for levain or autolyse 🙂
My oven spring was almost too good, the score opened up beautifully but then it cracked open more at the ear.
Hi Sune,
Looks perfect and want to try it, do you have a suggestion, if I am not willing to put it into the fridge, but leave it out on room temperature, how much time approx. does it need till it will be ready for the oven?
Your sourdough lesson is great and finally me bread is superb thanks to you. The only issue I am having is the very tough crust. It looks great but is very difficult to cut through. Any suggestions?
Love your work Sune! I’d appreciate if you could clarify the starter/levain part of this recipe as I’m finding myself confused between the video and the article somewhow. I’ve made this twice, the first time I misread your method and fed my starter at 1:1 (as normal), didn’t make a levain, and instead just put 148g of the risen starter straight into the dough. The dough felt and developed normally from there, and the baked bread was great.
The second time I fed the starter at 1:1 again, waited 8-10 hours, then took the 30g your recipe asks for and made a 1:3:3 levain from that, waiting then for another 8-10 hours. That went into the dough with everything else and created a fairly wet dough that didn’t quite pass the window pane test after 7 stretch and folds! This time the baked bread was….
I’m still relatively new to all this so am sure I’m missing something. If you can help me understand what that is that would awesome 🙂
PS – And do I need to feed the entire starter before then making the 1:3:3 portion the recipe calls for?
Love your work Sune! I’d appreciate if you could clarify the starter/levain part of this recipe as I’m finding myself confused between the video and the article somewhow. I’ve made this twice, the first time I misread your method and fed my starter at 1:1 (as normal), didn’t make a levain, and instead just put 148g of the risen starter straight into the dough. The dough felt and developed normally from there, and the baked bread was great.
The second time I fed the starter at 1:1 again, waited 8-10 hours, then took the 30g your recipe asks for and made a 1:3:3 levain from that, waiting then for another 8-10 hours. That went into the dough with everything else and created a fairly wet dough that didn’t quite pass the window pane test after 7 stretch and folds! This time the baked bread had virtually no oven spring 🙁
I’m still relatively new to all this so am sure I’m missing something. If you can help me understand what that is that would awesome 🙂
PS – And do I need to feed the entire starter before then making the 1:3:3 portion the recipe calls for?
I scale the recipe using 500g flour (and 335/100/10) to make one big loaf since have 1 banneton. I make it every week now, either with all white or with 10% Rye. The latter has an amazing caramel tasting crust. Thank you Sune!
Hey 🙂
I wanted to ask about the 25% rise. Is it from the basic volume at the beginning of the bulk fermentation or the volume after the last set of stretch and fold?
This is great! I noticed that you autolyse in the original recipe, but you skip that in this recipe. Why is that? Is it because the autolyse isn’t helpful at all in this recipe, or just because the benefit is small enough not to justify the extra work? Are there certain types of recipes where you think autolysis is more helpful? Perhaps higher-hydration recipes?
Autolyse is more helpful in yeasted recipe where fermentation is fast. Sourdough bread is left alone so long that the gluten can develop with the starter mixed in, that is unless you are fermenting somewhere warm 🙂
Hi Sune….Just wanted to point out that in the video of this recipe, you SAY 539g of flour, yet this recipe states 593g. Which is correct please?
593g is correct as it also states on the pinned comment on the video. With 539g the hydration will be around 75% which won’t be horrible 🙂
Straight out of the fridge and into the hot oven? No rise in the room between?
Nope, it’ll make it harder to score the bread 🙂
Love your videos and recipes. I have learned tons from watching them. If I wanted to use this recipe to make a single larger loaf, what size banneton would be appropriate and how would you adjust the baking time?
Making this for the first time, straying from my usual Lemon Blueberry foolproof loaf of yours! It seems quite wet & hard to handle though I will keep trying. I added some Parm cheese at 2nd stretch – am now going to leave for bulk fermentation. Is it supposed to feel so sticky? Thanks – will update tomorrow.
If it’s very wet, you should probably lower the hydration.
Use this link: https://fdgk.net/artisan-sourdough-bread-formula
Press the ‘Hydration’ button and select 65% and try that out.
Is your oven a convection oven or standard?
Both. I can choose and fan and non-fan mode.
I use fan when I bake in a dutch oven and non-fan when I generate steam myself.
I just made this recipe, and it turned out looking exactly like yours! Everything went just the way the recipe and video said. I even like the smaller size of the boules. This recipe will replace the one I’d been using for a couple years. Thanks! The videos are very helpful.
Thank you <3
That’s great to hear! 😀
Hello Sune, and thanks so much for all the great info and recipes.
I feed my starter at 1:1 periodically (50% water, 25% White AP, 25% Wheat) and that seems to keep it healthy and happy. Would it be advisable to just use my fed and peaking (2x or more) starter, and skip the 1:3:3 feeding step? How would I change the amounts if I do this?
Thanks!
Josh
Hey Sune.
Thanks for all the tuition and the time you put into it.
Your videos are the easiest and most straightforward I have found.
Love the new simplified method.
Bake every week now and even bought a baby Rofco B5 from Belgium.
I’ve made this a few times with great success. I’d like to try substituting maybe 30% kamut flour as the whole grain component, but I know that it has less gluten, so I’m not sure what hydration level to use. I was thinking that a tangzhong would help with that, but I am still not sure what value to use.
Excited to try this recipe and instruction! Quick question though, what size of banneton do you use for these boules? And does the size of the banneton make any significant difference? Thanks!
Update: It works great! (See comment above)
Hi Sine. I am making the same sourdough combination with bread flour and rye flour. I am also using a rye starter. My dough is a bit sticky but manageable. 80%. It looks like you are using a bread flour starter? If so maybe I should try it. Please let me know. Thanks for the video’s!
Thanks for the recipe. Is there a reason why you are preparing 210 gm of starter, but only using 148?
Just to make sure there’s enough. Feel free to mix less.
Hello Sune,
thank you very much for your recipes!
I made my sourdough-starter and baked a few breads. They keep getting better and better!
For now I am using a normal bowl, lined with a kitchen towel instead of bannetons, but they will follow soon.
Do you have an alternative way to make an awesome Bread without having a strict schedule on multiple days?
I have to work in an office and cannot do all the mixing and strech&folds in the morning after feeding the starter.
Yes, use my no knead recipe: https://foodgeek.dk/en/no-knead-sourdough-bread-recipe/
You may need to change the inoculation to fit it so that it will finish bulking as you come home, depending on your room temperature 🙂
I absolutely love this recipe! I’ve been using this recipe for all my sourdough bread lately. However, I noticed that the bottom of the bread becomes pretty though and hard to cut with a serrated knife, any tips on how I can prevent this? And would adding a ice cube just before closing the combo cooker help with more over spring? Thanks!
Would love to see a video on pan da crystal, have had a couple of attempts but would really like to nail it so any tips or tricks would be greatly appreciated.
Also I get asked a lot about about hydration from my fellow amateur bakers and think it would also be great to see a video on understanding how hydration works with different flour types.
Compliments on your media offerings, look forward to your next experiment.
I absolutely love this recipe. It comes out great everytime. I have it written on a note on the fridge for easy access.
Thank you <3
Hei Sune! I’ve been following you for a while, excellent work and advice all over! This is a really good recipe, a bit low in hydration but it makes for a fantastically strong dough. I get a lot of oven spring, yet the holes are overall pretty small, similar to yours. The dough is airy, but no nice big alveolas. Is this due to the rye, or the low hydration you think? I bulk ferment to almost 50%, but still… Mange takk!
It’s probably because of either your flour or you are not handling the bread carefully enough during shaping 🙂
Hi, in your other post you explain why you should never add the salt and starter before you’ve let the flour and water autolyse. But in this recipe you’re adding everything at once – which one is correct?
If you read the article it says that this recipe is the result of over 30 experiments that shows what works and what doesn’t work.
Both recipes are correct, but this one is easier and it works as well for the results 🙂
When hearing he oven, do you use the fan option or only upper and lower heaters?
Hello Sune, and thanks so much for all the great info and recipes.
I feed my starter at 1:1 periodically (50% water, 25% White AP, 25% Wheat) and that seems to keep it healthy and happy. Would it be advisable to just use my fed and peaking (2x or more) starter, and skip the 1:3:3 feeding step? How would I change the amounts if I do this?
Thanks!
Josh
Getting great results with your recipe! Thanks for sharing! Though my bread is coming out a bit gummy on the inside. Even if I make sure to let it fully cool before I cut it. What can I do to get a less gummy bread? I don’t want to cook it longer because the outside is coming out nicely browned after 20 minutes with lid on plus 20 with lid off.
Also, if I wanted to make a single large boule would I keep everything thing the same (besides dividing into two of course)?
Great tutorial. I have baked your bread a lot and tried to tweak as much as I could but I end up with a very sticky dough when I près have and final shape. I live in Taiwan where it’s now 30°C with 85% humidity and I think it must affect my dough. I did 20% inoculation and also 10% but still very sticky. What am I doing wrong? Thank you.
Hi Sune. Love your video’s on you-tube. My question: why retard in fridge? Some recipies on the net are without fridge and baked directly after proofing. Your little buns are also without retarding in fridge. Sorry if somebody else already asked the same but I couldn’t find it on your site and for weeks I searche for an answer. Taste? Thicker skin for crispyness? Ovenspring?
I usually bake in a claypot. After proofing about 25 up to 40%. (so no retarding in fridge). I moisten the lid of the pot just a little with water and put the pot in a cold oven, heat up to 240 C for about 45 to 60 min.
Remove the lid and turn oven back to 200 C for another 10-15 min. Good results. I read about the cold oven somewhere on the net but don’t understand how the ovenspring actualy succeeded. Something with slow up going temperature maybe? Any ideas? Have you ever baked in a claypot? Thank you in advance for replying.
It’s for the taste. The taste develops much more when you prolong the fermentation, but you can absolutely bake after shaping. You need to add a final proof until the dough passes the poke test.
Is it OK to put the dough in the refrigerator after the stretch and folds and take it out the next day to finish the 25% rise then shape the loaves?
Hey Sune! Thank you for this! I appreciate you and your work!
I’m wondering why is there a difference between the precent rise needed in this recipe during bulk fermentation, which is 25%
and the precent needed in the “yeasted artisan bread recipe”: https://foodgeek.dk/en/yeasted-artisan-bread-recipe/
which is 100% ?
If I take the same base recipe and change the yeast to sourdough starter (adjusting flour/water quantities in order to keeping the hydration level the same), should I let the dough raise less in volume? (25% instead of 100%?) What’s the logic behind that? if in both cases, in both recipes, after the room temperature bulk fermentation, both doughs (yeasted version and sourdough starter version) go into the fridge for a cold retard?
I’ve been having issues with under fermentation/under proofing with my sourdough bread, while my yeasted bread turns out perfect. Help!
Commercial yeast is so much more powerful than a sourdough starter. There’s enough power to rise twice to 100%, where as the starter only has so much more power and need to be managed carefully 🙂
Hey Sune!
If I wanted to use a stand mixer instead of stretch and fold, would you still wait an hour after the initial mix or just jump strait into kneading with the dough hook?
Thanks!
Josh
If you want to use a stand mixer, you should have a look at my recipe for that: https://foodgeek.dk/en/sourdough-bread-stand-mixer-recipe/ 🙂
When you refer to “rice flour” in the recipe actually, are you referring to “rye flour”, or do I need to use rice flour as well? Thank you! So excited about this revipe!
No, I mean rice flour, ground rice grains 🙂
Hi. I plan on making this bread to tomorrow using my Dutch oven. I note that you refer to 260c reducing to 230c but you dont say if that is using the fan or not.
It works both with or without the fan on. If you prefer a darker and crispier bread use the fan, if you prefer it lighter and not as crispy don’t use the fan 🙂
Hi Sune
Thought I would let you know that the bread turned out great. Was very pleased with it. Also love your sourdough pizza recipe which is now my all time favourite.
I have also made your baguette recipe but I wasn’t too happy with the first attempt. Probably because I live in the Channel Islands and our baguettes are flown in from France on a daily basis. – Guess we are spoilt. However I did some thinking and changed the flour in your recipe to french T 55 flour and the result was much better, just needs a little bit of tweaking. Maybe you should experiment with this flour when you have time and come up with the perfect baguette. 🤗
I was wondering if you were thinking of updating this recipe after your experiment of turning off the oven during the initial 20 minutes of baking in the dutch oven?
I’m new to the baking world and jumped on the sourdough bandwagon like many during COVID. My first number of attempts were dismal to say the least, but now that I’ve followed your recipe a couple of times I’ve had beautiful, tasty loaves come out of the oven that I thought I’d never achieve. Many thanks for this! I look forward to checking out more of your content 🙂
Thank you <3
Hi Sune.
Ive been trying to make SD followi g that recipe. Im only using rye starter -> make wheat levain and then mix proper dough. However if, after 3 or 4 strech and folds (when it passes window pane test), SD grows more than 30% its getting so sticky and so loose. Its hard(50% growth) or impossible(75%) to shape. Its loose and very sticky. If I shape it after 25% growth its possible to hande but crumb isnt open. Ots very tide and the dough goes down in the oven first then its starts to rise.
Could it be possible that without proofer, my BF takes 6-9 h after last streach and fold and its to much time without streaching the dough?
Hi Sune.
In your videos you BF your dough from 25% up to 100 % in a proofer. If Im not using proofer and let it BF in 21-22 Celsius it takes about 4-8 h to get such a rise. Is it okay to left SD for 8 h without streching or folding or something else? After 6 h its about 75% of growth and the dough doesnt hold its shape at all. Ots very sticky.
I bulk ferment from 0 to 25%, by the time you’re done with the stretch and folds the dough shouldn’t have grown at all 🙂
Your dough is over fermented, and it can probably only make a very flat bread. I’d bake it in a tin 🙂
Hi Sune!
Ive been trying to reply to your comment but it doesnt work.
If I go 25% rise with BF the crumb seems very underfermented. Its very tide and wet. Ive been looking for help on some FB groups and Ive been told there, to push BF until SD double. Trying that Im facing issues I told in previous comment. Anything there You could suggest?
Also one more question. In your SD pizza recipe, you want to BF until SD doubles. If mine gets overproofed before it rises 50% how can I do SD pizza?
It sounds like your starter isn’t active enough. After a feeding how much does it grow?
Hi Sune!
I store whole rye starter in the fridge. Before baking I feed it 1:5:5 each 12h 3 times. At least it doubles. Then I make proper amout of wheat starter, same ratio 12-14h before mixing dough. I never measured wheat starter rise. I assumed if rye starter at least doubles wheat is ok after same time.
Doubling makes it a bit on the weak side. Mine usually get’s close to quadrupling.
Just feed it a couple of times at 1:50:50 and that should optimize it. Then you can feed whatever you need for your bread.
Thanks for your feedback.
Ive tried that few times before. I noticed the lower ratio the bigger growth. Isnt it normal that whole rye starter growths 2,5 – 3 times and wheat one, like yours, can even quadriple?
Sune, thanks for your feedback. It means a lot.
Ive done that (1:50:50) few times and it didnt make things better. Ive been told that 2-3 times growth with whole rye starter is good. However today I checked my wheat starter (made from rye starter yesterday) and it didn’t double for 12 h. Still try to feed my rye starter 1:50:50 for few times and follow until it triples?
Yes, that sounds like a good plan. I agree that you probably can’t get it to quadruple, but it should be able to triple.
Is it a very stiff starter at 100% hydration or do you keep it at another hydration?
Hi.
I keep it at 100% hydration. Ive also noticed, if my SD growth >= 50% its very sour. As you mentioned, it seems that its alredy overproofed. But how is that possible? Overproofed and growth only 50%? Because of not strong enough starter? Is it possible that my starter have bad bacteria:yeast ratio? If it is, 1:50:50 will help or I need try something else?
What ratio do you feed your starter at when you are going to bake. At 1:1:1 most of what is sour will be kept in the starter, but feeding like 1:10:10 the resulting starter won’t be very sour at all.
The 1:50:50 will cure it completely of being sour 🙂
Hi Sune!
Its me again. Ive done 1:50:50 for 3 times and today in the morning my starter smelled like sauerkraut. I guess something went wrong. Maybe the temperature for starter growth have something to do? Mine have been growing in ~28 Celsius.
I have been using this recipe for 5 weeks now and loving the results. Getting more confident and baking more beautiful bread each week. Thank you for this resource.
I’m slightly confused by the recipe, forgive me, I’m fairly new to baking. Just so we’re on the same page I’m using the 2 bread recipe. The ingredients call for 148g of starter, but the “Feed the starter – The night before” section instructions indicate to feed the starter 30+90+90 (210g), then the subsequent section “Mix the ingredients – Morning” call for 148 g of starter again.
You need 148 grams for the recipe. The rest is for you to keep to bake your next bread 🙂
Sune, Thank You!
You’re welcome! 😀
Jeg håber, at denne Google-oversætter virker. Jeg må have kopieret en gammel opskrift på håndværkssurdejsbrød, da den brugte deciliter i stedet for gram. Jeg har lige fundet en opskrift på håndværkssurdejsbrød, der bruger gram. Jeg tror, jeg vil bruge denne i stedet for den første, jeg fandt. Enhederne ser ud til at være MEGET TÆT, når de er konverteret.
I’ve never used deciliters or any volumetric measurements for this recipe.
I did make this one for people who don’t want to invest in a lot of equipment before trying sourdough bread: https://foodgeek.dk/en/simple-artisan-sourdough-bread-recipe/ 🙂
I’ve appreciated this recipe and have made it half a dozen times already. I’m now going to attempt to tweak it to my preferred process and was wondering if you might have thoughts on this.
For starters (pun intended), I’d like to find a way to use a smaller starter. The idea here is that I will have less over proofed flour in my dough as a percentage of the recipe. The dough might develop a little slower in the first rise, but I would think that might, if anything, give it more flavor development.
Second, my starter hits peak way before 9 hours. Probably in half the time. Are you ideally trying to get the starter at its peak, or are you going 9 hours to develop acidity in the starter?
Third, I’d like to use just one vessel for everything until the two shaped dough boules/batards are ready for the cold proofing. It’s too much transferring and cleaning. Ideally, the mixing bowl.
Lastly, and this might have more to do with the particulars of my starter, but I’d like to increase the sour character more. It’s light and complex, and I like it, but turning it up 1-2 notches on the acid dial would be nice. I’ve tried going 2 days in the fridge or longer on my starter, but that works against my oven spring for some reason, and I do not notice an appreciable difference in flavor to justify the slightly deflated bread.
You can absolutely make those changes. My recipe is just a starting point.
The reason I use two different container, is that it’s hard to tell the rise in a bowl and it’s hard to do stretch and folds in a large square container 🙂
I have a sour sourdough video coming out soon. Stay tuned.
First of all thanks for the great content, it really helped and still helps me along my baking journey.
I’m trying to understand how baking percentages work but I can’t figure out how you calculated the amount of water.
So if water is 69.9% of the total flour quantity that means that the total flour quantity should be around 709g ( 496g water * 100/ 70):
– but if I add 593g bread flour and 148g rye flour I get a total of 741g
– or if I add 593 flour plus 74g flour from the starter, which is 100% hydration, I get a total of 667g
– and if I add all of them I get 741g ( total dry flour ) + 74g ( from the starter ) = 815g
This is driving me a little crazy, please tell me what I’m doing wrong 🙂
Read this: https://foodgeek.dk/en/bakers-math-explained/ 🙂
I did this recipe for my first time and the crust was so hard we couldn’t eat it. How should I correct this? I’m a beginner.
Sune, thanks for all your guidance, really appreciate all the time you take to do this and show us. Quick question about the banneton size. I saw you use 700g dough for your 7″ round banneton. Most places I’ve looked at state less dough for a banneton that size. What’s your input on this? I’ve only seen something different from you. I’m sure there’s a reasoning since you’ve been doing this for quite some time. I’m curious as to what you’ll say. I mean your bread is a thousand words. Is the reason because the type of dough it is? Should this work with any type of dough? Thanks in advance. Looking forward to see how my journey goes.
700 grams just fills up the banneton, making the final shape better. It’s just a personal preference. It should work with any dough.
Hi Sune,
I’ve had pretty good success with this recipe for several months now (thanks for sharing it, and for your excellent videos).
I would like to start making a nice dark rye sourdough, but less like the Jewish and Danish versions you have.
I have access to light fine rye flour as well as roasted barley malt flour (dark cocoa brown in colour).
Do you think I could substitute a little of the plain bread flour with the dark malt to get the depth of colour?
You may want to look at the Swedish limpa bread: https://foodgeek.dk/en/sourdough-limpa-bread-recipe/ 🙂
Hi Sune – Thanks so much for all of your great videos and recipes! 🙂 I’m sure you’ve probably addressed your reasoning for the 25% rise during bulk fermentation in one of your videos. Could you elaborate on that here – and why you’ve chosen that over the typical “double in volume” recommendation found in most other bread recipes? I’m intrigued to know if one of your many experiments helped solidify this for you. Thank you!
I did an experiment showing that around 25-50% growth was the right amount for a great crumb and lovely oven spring. It’s not the whole truth, but it will get you good results without knowing much more. 100% or doubling seemed to give a flat bread. All this is, of course, only for sourdough. For commercial yeast, doubling is good and should be done 🙂
Excellent – thank you Sune!
Hi Sune, I have baked a few sourdough breads in the past weeks. I wonder why my dough is always full of bubbles at the top when I’m shaping my dough?
Is it because the temperature in my country is too high (30C)? Or because I’m done 6 stretches and folds in 4 1/2 hrs time before shaping my dough? You think I should lower the ratio of my starter instead of 20%?
BTW, I’m trying your method in adding melted butter in the mixer. How much melted butter should I add in?
Hi Sune – thanks so much for this recipe and process. Quick question about the 500F blast for the first 20 minutes of the bake. I’ve always baked my bread at 450 with great results. Can you please explain why the 500F interval is important? Thanks! Patrick
It isn’t. I bake at 450F all the way through my bakes nowadays. I guess it’s time to update the recipe 🙂
Thank you! 👍
I saw that change to 450 for the entire bake on your seeded sourdough recipe and video. Nice because you can overlap the 2nd half of the bake for the first loaf with the first half in the dutch oven for the second loaf . Uses the oven heat more efficiently…nice.
Thanks for all the effort you put in the video’s and blogpost.
What is the difference between the artisan and beginner recipe on your website?
And i’m not sure when this recipe is published but is there like an 2022 updated recipe based on all the experiments you did in the past years?
The beginner recipe is the “old” way and is much more complicated. So the Artisan one is the “new beginner” recipe 🙂
Sune,
Thank you for what for me is the clearest, most straightforward and effective recipe for good sourdough that I have come across.
The results are superb as written, something that cannot be said for many others.
I’ve stopped looking, this is my go-to.
Thank you <3
Thank you for this great recipe! I have already used it many times:). I was wondering one thing: if you want to make smaller breads (let’s say 4 or 6 instead of 2 with this recipe), what would be the oven time for the breads? Still 2x 20 minutes, or less?
20/10 for 6 I’d say, but try to check the center temperature after 30 minutes total. It should be 99°C/210°F.
Just tried this recipe and the results where amazing. I used 1/2 of the recipe twice. By accident I put unfed starter and the bread rose better and hed better crumb and crust than the younger starter.
I also have a question regarding baking after refrigeration. Is it better to put dough cold into oven or wait for it to come to room temperature.
Thanks 🙂
I never let it come up to temperature, it’s easier to score and the oven spring is better 🙂
What’s the best way to keep the bread after baking.
TIA
When it’s cooled down, I cut it into slices, and then I freeze it. Then I take however many I need and thaw those.
Otherwise, it depends on if you want to keep the crispy crust or for it to say well the longest.
Crispy: Cloth Bag
Stay good for the longest: Zip-lock bag.
Hi Sune
How do you calculate hydration? In your recipe, you write 70% (69.9%) hydration. But isn’t it more. The water makes up 66.9%, where does the rest come from. The sourdough is 100% hydration, i.e. of the 148 g of sourdough there is 74 g of water. This means that there is a total of (496+74) g of water, which corresponds to 77% hydration. Is there something I misunderstood.
Best regards Ole
There is also flour in the starter, so you need to add 74 to the flour as well, so 70% 🙂
Hi Sune – Mixing up the dough for this recipe yesterday reminded me of a question I wanted to ask you. In your “Experiment Time!” series, did you ever do a side by side comparison of autolyse vs fermentolyse? Curious to know if one method or the other produces observably beneficial differences. Thanks!
Yes, I did. Here it is: https://www.youtube.com/watch?v=RjNHNI7nqsg 🙂
TY! 😃🙏
I grind my own wheat flour and have struggled to get airy sourdough bread with good oven spring using a combination of bread flour and my home milled wheat flour. This recipe worked great! I also practiced the windowpane scoring and got great results for the first time. My Dad is starting his sourdough again and I’ve sent him links to some Food Geek videos because they are fun and informative. I posted photos of the bread on Facebook.
Looks great/tastes good but too dense….no oven spring. How do I fix?
When you feed your starter, how much does it grow?
Is the Dutch oven absolutely necessary? I’ve just invested in a big baking stone. Will that suffice with some steam?
Hello Bob,
You can absolutely bake on a baking stone with some steam generation, it’s just a more advanced baking method, which is why I am not covering it in this article.
You can see it explained in this recipe: https://foodgeek.dk/en/sourdough-bread-with-cheddar-recipe/
Sune
Hi Sune,
Made my first sourdough with your recipe. It turned out great! I find the bottom is too dark. Just wondering if there is something I can do to help with that. The rest of the bread is a beautiful brown.
Also could I bake it as one large loaf instead of 2 smaller ones and what would be the change to the baking time?
Thanks!
Jenna
Hello Jenna,
You’ll need something to even out the bottom heat. I’d recommend a baking steel and putting the DO on top of that when preheating 🙂
Sune
Hi Sune! My oven does not reach 260°C, it only reaches 230°C maximum. Can I still bake this bread and if so, how much longer should I bake it for? Thanks!
I usually bake at 230°C/450°F for the entire bake these days. A new, updated version of this recipe is coming soon.
Hi Sune. Thank you so much for your high quality content! I’ve been floundering with my sourdough recipes and process for a few years. Close, but not quite there. I just reviewed your Master Artisan video and gave it a try (scaled down to a single loaf). OMG – I couldn’t have been happier. I think your process, especially the cold proofing, is what made such a huge difference. This is now my new baseline approach. Looking forward to exploring your other content. THANKS SO MUCH!
Awesome. Thanks. I’ve just updated the recipe to be a bit simpler and contain more relevant information. The video will be released Saturday.
Literally started this last night only to come back and see the recipe change! XD Thanks for the way back machine coming to the rescue.
There’s no reason you couldn’t have picked up, where you left off on the old one 🙂
The new recipe appears on your site but the one that is printed uses the old measurements. OF course, it isn’t a big deal to print it out and write in the new measurements but it would be better if you did it. Anyway, the bread is cooling off and I expect a nice surprise. For the first time I mixed it in a mixer and hope all comes out well.
I cleared my cache, can you please see if you see the new measurements?
Can you share what changes occurred between your version 2 and version 3 master recipe?
Good point. I’ll add it to the article.
It says “yump to the video” ……. but…… there is no video (or link to a video)…..
WHhhaaat??
😉
You are probably using an ad blocker 🙂
I’ve been using this recipe for 2 years now. I really like the new updates! Thanks so much!
Thanks for all the info! When you are testing flour hydration do you mix the bread flour with the rye flour to test or is it just the flour that you are using the most of?
In the video I am just testing a bread flour, but testing the mixture will be best for that specific recipe 🙂
Thanks for this. I am a huge fan of your channel, I love baking bread but, above all, I love trying to understand things and your experiments are really great!
Just one comment, when I press the Print Recipe button, it opens a new page but it is not possible to change the number of pieces to bake.
Good morning, and thank you for sharing your knowledge!
In this new recipe you have a master list of ingredients and I wonder if the flour and water totals include the flour used to feed the starter or if that is a separate addition of flour and water? I would think not, but better to be sure!
Thanks again,
Glenn, USA
That is not included here. Feed your starter using whatever works for you and just add it to your dough within 12 hours of it peaking.
Hi Sune, thanks for the recipes! I’ve tried the old version several times and it’s always been great. But my most recent attempt with your new version, I tried for a no-knead version and it didn’t work very well. During the bulk proof step, it doubled in size (@~22 C), but it was not very stretchy – it didn’t seem like the gluten had developed properly. I foolishly went ahead and finished up anyway, and unsurprisingly it had all the characteristics of being underproofed. Should I have let it rise more than 100%? Does no-knead need a higher hydration?
I’ll try again, but if it doesn’t work this time, I’ll just go back to the stretch and fold.
It sounds like a fluke. How long did this doubling take?
hi Sune! I have been baking your last version many times and it was perfect. ill try this one now, hope it will be great as well. I have 2 questions pls:
1. I dont understand why shuld I leave the dough to rise differently with every room temp. why when its cold bulking it shuld rise 100% and when its warm only 25%?…at the end the dough gos to the oven on the same temperature..i can’t understand that.. 2. you say that the dough shouldn’t be covered when it goes to the fridge? I belive i didn’t understand that..wouldn’t it be dry?
and 1 more question🙏my room temp. is very warm…around 30c…I just finished 3 rounds of stretch and fold, shuld i leave the dough on the counter? or can I put it in the fridge for over night bulking? and tomorrow take it out, divide and continue as you say? thank you!
The reason you should let it grow to different heights is about how long it takes the dough to get down in temperature. When the dough is 30C/86F warm it will ferment fast, so by the time the dough is in the fridge, it’ll take it longer to be down to “no fermentation” temperature 🙂
hi, after trying version 2 I feel version 1 thats i was baking many time last year was better results for me…is there any way to find it?
thanks,
Nava
It’s not that different. It’s more details like how much to let your dough grow during fermentation and skipping stretch and fold 🙂
I am curious to ask why you tend to bulk ferment at 30c (86F)? Do you prefer the faster fermentation time or do you find the taste is better? I have the same bread proofer so will have to try the different temps to see how it may affect taste. I wonder if it provides a more sour taste which is definitely what I would like.
So, there are two types of acid that develops during fermentation: acetic acid and lactic acid. Acetic acid is has a vinegary taste, whereas lactic acid has a smooth, yogurt-like taste. Higher temperatures favor lactic, whereas colder temperatures favors acetic. Also, I like that it speeds up the bulk fermentation.
If you want your bread more sour, you need to cultivate a sour starter. Feed at 1:1:1 or 1:2:2 and let it sit until it’s sour before you feed again. The more you use in the final bread, the more sour taste you will get. This will be acetic acid.
Thank you for such great articles + videos! New sourdough-er couple questions that aren’t clear from the recipe:
1. Why does the % rise target (25/50/100) change based on temperature? (why not 25% rise regardless of cold vs warm?).
2. If using 3 stretch and folds method, this means adding 1.5 hours of time, not skipping the previous 60 min rest (is that right?)
So with stretch and fold: wait 60 mins, stretch and fold 3 times over 1.5 hours, them bulk rise?
no-knead, wait 60 mins, bulk rise?
Does the no-knead not require even more rest time to compensate for the lack of manual movement?
Thanks so much!
Aaron
Hey Sune! Loving your work – thanks for the great advice and recipe. I’ve made successful sourdough in previous weeks using your method but the last several times my loaves are coming out significantly flatter. It’s like I had incredible beginner’s luck! I believe I’ve got the shaping method down and that I’m allowing the my starter and bulk fermentation to occur for the correct amount of time – using a flat sided container and measuring expansion rather than waiting a certain amount of time. The weather has got significantly colder, but I’m hoping that so long as I’m measuring by expansion and not time, that shouldn’t matter too much? I’m allowing approx 50% expansion as it’s about 21C in my kitchen.
The bread goes into my bowl with tea towel nice and bulbous and tensioned, but when it comes out it has flattened quite a lot, I think much more than yours in the video. Should I be creating more tension or using less hydration to have it hold it’s shape? I’m using a 67.5% hydration because I’m using plain flour and 10% wholemeal. It looks and feels good when it goes into the bowl.
Any thoughts as to why my bread comes out about half as risen every time now?
Did you notice if your starter started to slow down? Is it’s peak much lower? Because that can happen when the seasons change.
I use my proofer for the starter as well, it keeps it healthy and active.
Love FOOD GEEK!!! and the new updated SD version.
Thank you <3
Just wondering what it means to “put peel overtop”… Thank you!
If you look at the video, you will see it, but I mean put the peel on top of the proofing basket, and invert it.
Hi Sune, this is a great recipe, I have been making it for a couple months now but I wonder if there are any changes to Bake Time or Temperature necessary if I want to make one large load rather than 2 small ones?
This is the recipe I didn’t know I needed. Delicious! Novice bread baker here and while it’s not the prettiest, it doesn’t matter but it tastes so great! I will practice more but this is going to be my go to from now on. Thanks so much for the education!
This has become our everyday bread. Sometimes I add chopped up dried fig and / or a little wheat germ.And Thank you Sune for your experiment videos. I have learned so much.
Hi Sune,
Your recipe for the basic artisan bread is fantastic and I got the folding proofer which makes the whole thing more predictable (and I use it to make kefir and yoghurt also). One question about adding seeds to the bread before baking it. I grew up visiting Denmark a lot (min mor hvar dansk) and remember birkes fransbrød from my childhood. Can poppy seeds be sprinkled over the egg brushed artisan loaf before baking it or will they burn given the high temperature?
Thank you for a great website! I had not baked bread for years, and got back into it with your recipe after getting a starter from a friend!
Venlig hilsen
Caroline
Hej Caroline,
What I do, as part of the final shaping, is mist the top of the loaf with water, then roll the loaf on a dish towel with poppy seeds (or whatever seeds or grains) and put it in the banneton. They’ll stick very excellently this way.
Mange tak! I followed your instructions and the poppy seeds stuck very well to the surface of the boule, which is now in the fridge
PS: Oat meal pancakes with the sourdough discard are also awesome!
hi! I have followed all your you tube videos and they are very helpful and the bread is great!
recently I have found that although the crumble is good the loaf pancakes once placed in the oven. what causes this? I.ise 70/30 marriages strong white/ wholemeal spelt and 70% hydration, 3 days in baneton in fridge, shape stays good going into oven. scores across top at angle, 30 mins full power, 25 mins on lower power. regards, diarmuid, dublin
Can I bake 2 loaves at the same time instead of adding 2nd loaf in halfway
When u feed starter the night before baking are you feeding it ap flour or bread flour?
Cheers!
I use organic all-purpose flour from my local supermarket.
Hi! Thank you for this recipe. I will try. Can I follow it using only Caputo Oro flour starting with a total hydration level of 65% ? Thank you 🙂
With the Oro flour you can go all the way to 80% with relative ease 😁
Ive tried the recipie 2x and not had sucess,… ist time i thought it had risen 25% in a warm place but when cooked to was very dense with no air holes in the crumb. The 2nd time I left it 24hr prooving and it doubled in size but when i prepared the boule stage both pieces fell back and shrunk, unfortunately the 24 hr proove was wronf as the beread tasted so strongly of lactic acid – oh the crumb was a bit better but still not as you show in your pictures.
Hello Steven, go to my Contact Foodgeek | Easily get in touch with Sune page and write me. I’ll help you troubleshoot.
Sune