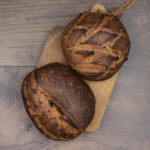
No Knead Sourdough Bread
Sourdough bread can be complicated, so why not make it without kneading? You can still get an excellent tasty, crispy artisan bread.
Servings: 2 bread
Calories: 1356kcal
Ingredients
- 576 g bread flour
- 144 g dark rye flour or another whole grain flour
- 14 g salt
- 144 g sourdough starter fed and grown to its peak
- 522 g water divided
Instructions
Mix dough
- To a mixing bowl add: 576g bread flour, 144g rye flour or another whole grain flour and 14g salt.
- Mix it so that everything is well combined.
- Then add 144g sourdough starter; it should be fed and grown to its peak.
- Add 482g water. That will make the dough 70% hydration.
- If you feel like the dough isn’t too slack, you can add up to 40g extra water. Be careful about adding too much water.
- Be sure to mix the dough very thoroughly. You won’t get another chance.
Fermentation
- When the dough is mixed, put it into a see-through container with straight sides. Press the dough down, so the top is level.
- Mark the top of the dough on the outside of the container. I use a whiteboard marker, but you can also use an elastic band. Place the dough somewhere warm.
- You should let it grow until it’s grown by about 25%.
Divide and pre-shape
- When it's grown 25%, it's time to do the pre-shape.
- Dump the dough out onto your kitchen counter and divide it into two. Then shape each dough into a tight ball.
- First, we pull each corner of the dough to make a tight surface on the part of the dough facing the table.
- Then flip over the dough balls and move the dough toward yourself with the scraper. There shouldn’t be any flour on the table now.
- That pulls the dough down in the front, making the surface tighter. You can use one hand to guide the dough but touch it minimally.
- Also, if the dough feels very wet initially, you can wet the scraper, but again, do NOT add any more flour.
- Then let the dough rest for about 20 minutes on the counter to relax the gluten.
Final shape
- After that, you should final shape each ball into its final shape.
Shape as a boule
- To shape the bread as a boule, do precisely as the pre-shape.
- Put the bread in a banneton with the bottom facing upwards.
Shape as a bâtard
- To shape the bread as a bâtard, do it this way:
- Lightly flour the top of the ball, then flip it over.
- Pull the dough out into a rectangle, and flip the sides towards the middle.
- Roll the dough up pretty tightly, and seal up the ends of the dough.
- Put the bread in a banneton with the bottom facing upwards.
- Stitch the dough to tighten the dough further. It's kind of like lacing a shoe. Watch the video for details.
- If you use a liner, you can skip putting any flour in, but if you use it without, I will usually spritz the banneton with a bit of water and then flour it with rice flour.
Retard the loaves
- Then I put them both into plastic bags and the fridge.
- How long you leave them there depends on your schedule, but I wouldn’t recommend less than 8 hours. You should probably let the dough grow by more than 25% during bulk fermentation If you want a shorter retard.
- You can leave it in the fridge for up to 48 hours, but it should be icy. I have my fridge set to 3°C/37°F.
- Because of the relatively short bulk, the doughs will grow in the fridge, even at these cold temperatures.
Bake
- When ready to bake, heat your oven to 260°C/500°F with a dutch oven and baking steel inside.
- When the oven is hot, grab one of the doughs from the fridge. Don’t let it come up to temperature.
- Just dust the bottom with rice flour so it can slide easily off the peel and flip it onto the peel.
- Score the dough and place it inside the dutch oven inside the oven. Put the lid on the dutch oven and bake for 20 minutes.
- When the 20 minutes are up, remove the lid and turn down the oven to 230°C/450°F. Bake for about 20 minutes more.
- You can play around with how long you should keep the bread covered if you like a thinner or lighter crust. You can cover it for the entire bake if you want.
- When the bread is done, grab it from the oven, and put it on a wire rack to cool off. Bake the other bread the same way.
- Let both loaves cool until they are completely cooled down, or else your bread may not be done on the inside or become stale quickly because the steam inside the bread will evaporate through the cut in the bread.
Video
Nutrition
Serving: 1bread | Calories: 1356kcal | Carbohydrates: 277g | Protein: 44g | Fat: 6g | Saturated Fat: 1g | Sodium: 2734mg | Fiber: 16g | Sugar: 2g