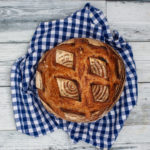
Sourdough bread for beginners
Learn how to make fantastic sourdough bread at home. It's much easier than you think. The most significant investment is time and a couple of tools that you can use every time you bake.
Servings: 2 bread
Calories: 1695kcal
Ingredients
Levain
- 40 g bread flour
- 40 g whole wheat flour
- 40 g sourdough 100% hydration
- 80 g water
Dough
- 686 g bread flour
- 152 g whole wheat flour
- 559 g water
- 185 g levain
- 19 g salt
Instructions
Levain
- The night before you make the levain, feed your sourdough starter. I usually take 50 grams of sourdough starter and mix it with 100 grams of bread flour and 100 grams of water and mix it well.
- In the morning, you should mix the levain. Mix all ingredients and put it into a tall see-through glass. Put an elastic band around the glass to monitor the growth of the levain.
- Cover the glass and put the levain somewhere warm. Preferably around 25°C/77°F.
- When the levain has grown to around 175%, go to the next step.
Autolyse
- To do the autolyse, we need to mix water and flour.
- Measure out all the flour in a bowl and all the water except 50 grams that we reserve for mixing the levain and salt later. Mix it but don't knead; get all flour hydrated
- Cover the flour and leave it until your levain has doubled in size. It took about 1 hour for my levain.
Mix the dough
- Put 185 grams of levain on top of the dough. Spread the salt over the top and add the reserved 50 grams of water.
- Mix it all very thoroughly. I usually use my fingers and push the levain through the dough and do some light stretch and folds. I keep repeating it until I feel like it's been mixed very well.
- Cover the dough and leave it to rest 30 minutes somewhere warm.
Bulk fermentation
- It's time for bulk fermentation. We develop the dough's gluten during the fermentation. With this dough, three stretch and folds are usually enough.
- Wet your hands so that the dough doesn't stick to your fingers.
- Grab the size of the dough furthest away from you with both hands. Grab hold and strech the dough upwards as long as it can go without breaking. Then fold the dough down towards yourself.
- Turn the bowl 180° (a half turn).
- Do another stretch and fold.
- Turn the bowl 90° (a quarter turn).
- Do another stretch and fold.
- Lastly, you should turn the bowl 180° (a half turn).
- Repeat the last stretch and fold.
- You have now stretched and folded the dough from all four sides. Leave the dough to rest somewhere warm, covered, for another 30 minutes.
- Repeat this process two times more.
- After the third stretch and fold, I will do a windowpane test. Lift and edge of the dough and stretch it with your fingers. You should be able to make a thin membrane without the dough breaking. Look at the video in the article.
- If the dough isn't strong enough to pass the test, I do a 4th stretch and fold and repeat the test. Do this up to the 5th and 6th stretch and fold.
- After the last stretch and fold, you should leave the dough until it's grown by 20-50% (usually 1½ hours).
Preshaping
- First, we are shaping the dough to build a gluten membrane on the outside of the dough. That will help the oven spring during baking.
- Pour the dough unto an unfloured table and divide it in half. Put a sprinkle of flour on top of both.
- Grab a lump of dough and flip it using your bench scraper so that the floured side is now on the table top.
- Grab the part of the dough that is the furthest away from you. Stretch it and fold it down in front of you.
- Repeat with the part that is right in front of you. Grab the dough with both hands, stretch it and fold it away from you. Repeat with the right and left sides of the dough.
- In a swift motion, invert the dough so that the part you previously floured will be facing upwards.
- Put your bench scraper behind the dough and pull it towards yourself. I hold the scraper in my right hand, guiding the dough with my left. The front of the dough should be pulled underneath, and the top of the dough should tighten.
- Now put the scraper in front of the dough and push it forward while twisting so that the scraper ends up behind the dough. You can now repeat the process in the previous step.
- Repeat until you have a nice round and tight ball. Pop any bubbles you see on the surface.
- Repeat with the other lump of dough. Let the dough balls rest for 15 minutes under a cloth.
Prepare the bannetons
- Make a mixture of half bread flour and half rice flour.
- Put a dishtowel in the bannetons. If you don't have one, you can use a bowl.
- Put some of the flour mixture in a strainer and flour the bannetons. It's better to use too much than too little.
Final shaping
- We do the final shaping to make sure the dough is super strong.
- Take a boule and sprinkle it very lightly with flour on the top.
- Flip it using your bench scraper, so the floured side is against the table.
- Repeat the process from the preshaping.
- When you have finished the shaping, grab the boule with your scraper and invert it into the banneton. The bottom should be up.
- Repeat with the other boule and place it in the banneton.
- Sprinkle the dough with rice flour and put the bannetons into separate bags. Make sure you get some air in there so that the plastic does not touch the dough.
- Place in the fridge overnight. Your fridge needs to be cold, so the dough doesn't continue fermenting. I have mine set to 2°C/35°F,
Heat the oven - next morning
- Place a baking stone/baking steel in the oven and put your dutch oven on top. Turn the oven to 260°C/500°F. If it doesn't go that high, put it to the maximum.
- Heat the oven for at least an hour. We want the steel/stone and dutch oven to be thoroughly warmed.
Bake the bread
- Take a banneton out of the fridge.
- Put a piece of baking paper on top of your peel and put it on top of the banneton.
- Turn it over and carefully lift the banneton off the dough.
- Slash the dough using a super sharp knife.
- Open the oven and move the dough to the dutch oven.
- Spray the top of your dough lightly with your spray bottle.
- Put on the lid and close the oven.
- Bake for 15 minutes.
- Remove the lid so the bread can get some color. Turn the oven down to 230°C/450°F. I usually bake it for another 20-25 minutes for this bread. I love it when the crust gets dark and crunchy.
- Remove the bread from the oven and let it cool on a wire rack for at least one hour, but preferably until it is COMPLETELY cooled off.
- Turn the oven back up to 260°C/500°F. When it is hot, repeat the procedure for the other bread.
- All you have to do is wait until the bread are completely cooled off, and get yourself ready for the best bread you've ever baked.
Video
Notes
The hydration of the sourdough starter
I assume that your sourdough is 100% hydration. That means that when you feed it, you use the same amount of flour and water (by weight). If you use a lower or higher hydration, you need to recalculate the levain. It's a bit over the level of what we are going through here, because this recipe is supposed to be for beginners. If you want play with the breads recipe, you can use my bread calculator here.The hydration of the bread
The hydration of the bread is 70%. That means there is 70% water to 100% flour. You calculate it like this:- The levain is 100% hydration, which means there is 50% flour and 50% water
- Total flour by weight = 686 grams bread flour + 152 grams whole-wheat flour + (185 grams flour / 2) from the levain = 930.5 gram
- Total fluid by weight = 559 grams water + (185 grams water / 2) from the levain = 651.5 gram
- Percent = 651.5 grams water / 930.5 grams flour = 70,01%
Nutrition
Serving: 1bread | Calories: 1695kcal | Carbohydrates: 344g | Protein: 59g | Fat: 9g | Saturated Fat: 1g | Sodium: 3810mg | Fiber: 19g | Sugar: 2g